
Measuring a cupped engineered floor after it has dried out, may show a perfectly good moisture content of 7%. The only indication that the top layer must have had a higher moisture content at some previous time, is the noticeable cupping.
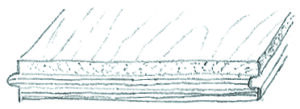
To save precious hardwoods and create more affordable products, engineered floors and laminated panels have become very popular. Engineered floors consists of a relatively thin wear layer of hardwood glued onto the core material. The core material can be plywood or some type of fiberboard. Since the backing is invisible, inexpensive softwood or wood fibers are used. One of the first engineered wood was plywood. Plywood is a very stable panel manufactured by gluing several layers of veneer together and changing the orientation of the growth rings with each layer.
Stability: Laminated floors and panels are expected to be at least as stable as a solid piece of wood. And they often are very stable. However, being made from different layers of materials can present a new set of problems. These problems appear mainly, when the moisture is not right to begin with or when the planks are exposed to changes in moisture content.
Good floor (flat)
If the top layer and the backing have the same shrinking tendencies, engineered floors will move just like solid wood floors. If the top layer and the backing shrink differently, then the panel is more moisture sensitive. More shrinking and warping can be expected.

Problem floor (cupped)
When the top layer shrinks or expands and the core does not follow at the same rate, the plank will curl or the panel will delaminate or surface checks appear.
Almost every piece of wood inside a home will endure some moisture movement in the course of a year. Weather and changing seasons affect the relative humidity inside a home and consequently the relative humidity affects the wood moisture in floors, panels or furniture. Small cracks appear and disappear with the changing seasons. This is true for solid and engineered wood. Operating an HVAC year round will stabilize the wood.
→Click here to see what made the difference of two engineered floor planks between flat and cupping.
Changes of relative humidity are usually followed by changes in wood moisture: For example, when the EMC of air is lower than the wood moisture content (dry winter), the surface and eventually the entire piece of wood dries out until the moisture content has reached the EMC. (Click here for EMC and corresponding relative humidity and temperature.
Wood: When wood is drying out, the surface dries first and shrinks. The wetter core will follow later. Cupping and surface checking can occur. Stresses can build up near the surface and cause the wood to check (small surface cracks). If the deformations are severe enough, the structure of the wood can be broken and the defects are permanent.
Over time, the core will also dry out and the entire piece of wood will have a uniform moisture distribution again. Any cupping may disappear. What may still be noticeable is the overall shrinking and warping due to the change in moisture content. Small gaps between the floor planks may still be visible. Some wood species such as Oak, Sycamore and Beech are highly susceptible to defects from shrinking. Check the Internet for Shrinking Factors.
Engineered Products: When an engineered product dries out, the same drying process occurs as described above. The surface dries out first and shrinks. The hardwood used for the top layer will determine how much shrinking occurs. Since the core is usually very stable, the hardwood layer on top is responsible if any problems occur:
- When the top layer shrinks as little as the core, you have a very stable product.
- When the top layer shrinks a lot more than the core, you have a product which will develop problems whenever the moisture changes. That engineered product will only be flat at the manufactured moisture content. The hardwood top will not fit the core at any other moisture content. >Dual-depth meters are ideal for engineered products.
Measuring Moisture of Engineered Floors
Wood Species and Measuring Depth matters for pinless Meters: Pinless meters only give accurate percentage moisture contents, when the readings are correct for different wood species or for the material being measured. In addition, the measuring depth is important. Most meters are calibrated for a fixed measuring depth of 3/4″ deep. Dual-depth scan meters are available with two independent sets of calibrations, one for 1/4″ deep and one for 3/4″ deep.
Solid Floors: Measurements generated by pinless meters are an average of the entire measuring field. This works well if measuring a solid piece of wood or other uniform material at least as thick as the measuring depth.
For standard meters with 3/4″ calibration, the floor plank should be at least 3/4″ thick for accurate measurements in percent value, if the meter has been set to correct for the wood species.
These requirements are not fulfilled when measuring floor planks 5/8″ thick, or when measuring floor planks composed of different materials (wear layer, core material and back).
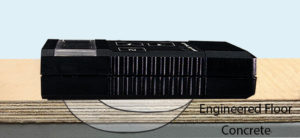
Measuring floor planks thinner than 3/4″: If the floor is installed over a concrete slab, there is always a possibility that the concrete underneath the floor is included in the measurements. The indicated moisture value is then higher than the actual moisture content of the floor. If you use one of the dual-depth meters at the 1/4″ depth setting, you can be sure that the concrete of the subfloor underneath the floor planks is not included in the indicated moisture value.
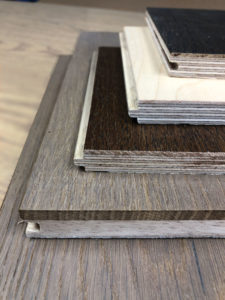 Engineered floor products: How can the right correction setting for the many new engineered floor planks be found? Even looking only at engineered Oak floors, there are many different types. Floors differ from manufacturer to manufacturer in thickness of wear layer, wood species for the core material, even the number of layers of core material. To get accurate readings the right correction setting for the meter has to be found for each type of engineered floor.
Our suggestion is to start with a few well acclimated sample pieces. They can be found in a show room, after acclimation on-site, or it could be a sample piece that a customer kept. If the average relative humidity in the area where the floor planks were kept was around 45%, then the moisture content of the sample pieces should be around 85%. If the average relative humidity if different use the EMC chart to find the corresponding moisture content. Now, it is one easy step to find the correct readout of 8.5%.
To start the calibration process, set the Lignomat dual-depth scanner to setting #50 and to 1/4″ deep. Then change the setting repeatedly until you get a readout of 8.5%. Repeat this process for all sample boards, then take the average of the readings. Your new found setting can be used for any future measurements being done to that same type of engineered material.
You will find that some floor planks can be measured accurately with the species setting of the wear layer. For other samples you may find different settings for the 1/4″ and 3/4″ measuring depth.
If no acclimated sample is available, set the meter to the wood species of the wear layer and check the wood. We found that the core will affect the moisture reading more the thinner the wear layer is. Consider the readings you get to be comparative (see next section). The values will at least indicate if all samples have the same moisture content or if there are big variations.
It is a lot harder to find the correction setting for a pin meter because the correlation between the settings is not linear. For pin meters call the meter manufacturer. If the wood species has never been tested before it may be necessary to send samples to the meter manufacturer for testing.
Taking comparative readings: As the name already says, compare readings. The information gained by taking comparative measurements is – all pieces have the same moisture content. Higher values mean more moisture, lower values indicate less moisture. This can only be applied if the measurements were taken with the same correction setting and the same measuring depth.
This method becomes more meaningful if a dry piece of the material is available. The measurements can now be compared to the dry value.
This is often done in the restoration industry to detect water infiltration into walls, ceiling, roofs, etc. The first step is to find a dry sample piece of whatever you want to measure and then compare the measurements of questionable areas to the dry sample.
Measuring moisture had become an important task for anyone dealing with wood floors, from the manufacturing of the flooring up to installation. If moisture problems occur. it is always helpful if there are records available to see what the floor measured before and compare to what the floor measures now. Obtaining moisture measurements and keeping records gives you the key to understanding wood floor problems.
As soon as floor packages are delivered, you should take a few moisture measurements. If you wait until the floor shows defects from shrinking and cupping it is often too late to file a claim. Too much time has passed and the moisture content at the time of delivery cannot be determined. The supplier may not recognize any claims.
Measuring a cupped engineered floor after it has dried out, may show a perfectly good moisture content of 7%. The only indication that the top layer must have had a higher moisture content at some previous time, is the noticeable cupping.
It is important to measure wood floors:
- at the time of delivery
- before acclimation
- after acclimation
- after job completion
Dual-depth pinless meters are ideal for the floor installer:
The Ligno-Scanner SDM works great when checking multi-layered engineered products. The measuring depth can be selected to be 1/4″ or 3/4″ deep.
Engineered or laminated panels can be measured with the 1/4″ depth for the top layer and the 3/4″ depth for the entire panel.
Installed floors can be measured with the 1/4″ depth without picking up any false readings from the sub floors and concrete underneath. Measurements for the stability test should be taken at the 1/4″ depth setting.